


How to build an AI agent — the four core components, the build order step by step, frameworks vs from scratch, and the pitfalls to avoid for a reliable agent.
| 4 Core Components | 1 Loop Is the Agent | ReAct Starter Pattern | 73% Enterprises Investing | Hours To Your First Agent |
| Quick answer: To build an AI agent, combine four components: an LLM (the brain that reasons and decides), tools (APIs, search, databases — how it acts), memory (short-term context plus long-term storage), and an agent loop (observe → reason → act → repeat until the goal is met). Build in order: define the goal, pick a model, add tools, add memory, write the loop, add guardrails, test, deploy. Start with the simplest version using the ReAct pattern, then add complexity only when the task demands it. |
Key Takeaways
- An AI agent is an LLM wrapped in a loop that reasons about a goal, calls tools, observes results and decides the next step — not a chatbot that answers one prompt.
- Every agent has four core components: the LLM (brain), tools (actions), memory (context), and the agent loop (the runtime engine).
- Build in order — goal → model → tools → memory → loop → guardrails → test → deploy — and start with the beginner-friendly ReAct pattern.
- The hard part isn’t the model, it’s the loop and the engineering around it: tool design, guardrails, and avoiding infinite loops, hallucination and cost overruns.
Table of Contents
1. What You’re Actually Building
Before any code, get the mental model right, because it’s where most people go wrong. A chatbot answers a prompt. An AI agent receives a goal and works through multiple steps to complete it — searching the web, calling APIs, running code, querying databases, sending emails, and checking whether its result actually solved the task. Anthropic’s working definition has become the field standard: an agent is an LLM autonomously using tools in a loop.
The crucial insight, repeated by practitioners: the gap between calling an LLM and building an agent is not the model — it’s the loop. Most agents that “don’t work” haven’t hit a model limit; they have a loop that never stops, a tool called with wrong arguments, or no plan for what happens after a result comes back. Once that loop clicks, the rest is wiring. This guide walks the build order step by step. It sits within our pillar on the best AI agent tools and builds on what is agentic AI. Demand for this skill has exploded — over 73% of enterprises are now actively investing in agentic AI systems — which makes knowing how to build one, not just describe one, genuinely valuable.
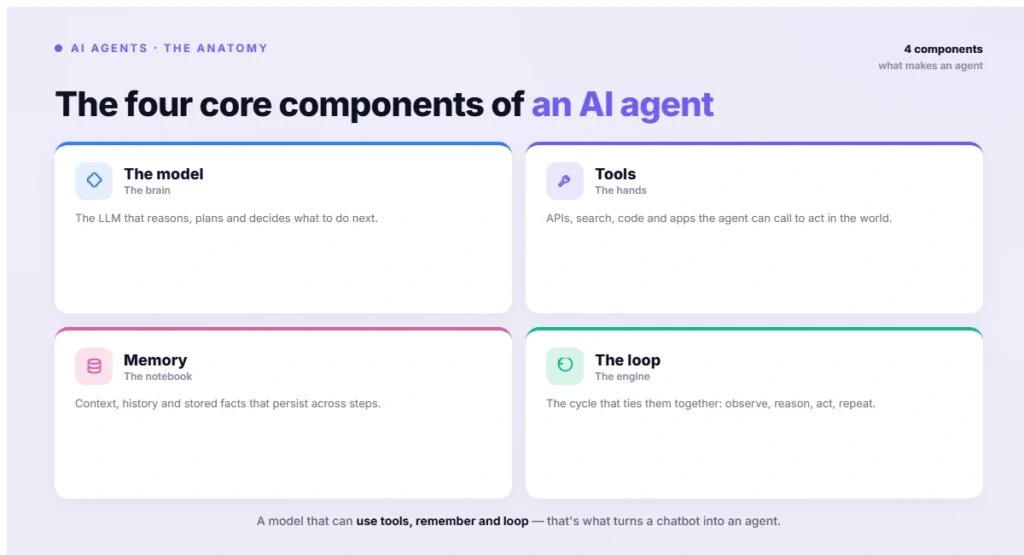
Figure 2: The four core components of an AI agent
2. The Four Core Components
Every AI agent has exactly four components working together. The LLM is the brain — it reasons, plans and decides what happens next (Claude, GPT and Gemini models do the thinking). Tools are what turn a chatbot into an agent: APIs, web search, databases, file systems, email and Slack are how the agent acts instead of just responding. Memory is what the agent knows and remembers — short-term memory handles the current session, while long-term memory (a vector database or SQL store) persists across runs so the agent improves over time.
The fourth component, the agent loop (runtime), is the engine that ties the others together. In pseudocode it’s simply: while not done and steps < limit: observe → reason → act → check. It runs until the goal is reached or a stop condition fires. This loop is what distinguishes an agent from a simple LLM call, enabling multi-step tasks, external information retrieval, and self-correction. Anthropic frames the basic building block as “an LLM enhanced with augmentations such as retrieval, tools and memory” — and increasingly, tool integration flows through MCP (Model Context Protocol), which standardizes how models access tools.
3. How to Build an AI Agent, Step by Step
Build in this order — each step depends on the last.
Step 1 — Define the goal. Write down exactly what the agent should accomplish and how you’ll know it succeeded. A vague goal produces a vague agent; a sharp success criterion shapes every later decision.
Step 2 — Choose your model. Pick the LLM that does the reasoning, balancing capability against cost. A common pattern is to route simpler steps to cheaper models and harder reasoning to a frontier model, which can cut costs substantially. See our guide to what is an LLM for background.
Step 3 — Give it tools. Define the actions the agent can take and document them clearly — poor tool descriptions are a leading cause of failure. Function calling is the underlying mechanism; the modern, portable way to wire tools is through the Model Context Protocol, which lets you connect to a large ecosystem of existing servers.
Step 4 — Add memory. A loop without memory forgets everything between runs. Add conversation history so the agent carries context across turns, and manage the context window so it doesn’t overflow. Use a knowledge base for static facts and a vector store (FAISS, Pinecone, Weaviate) for persistent long-term memory.
Step 5 — Build the loop. Implement the observe-reason-act cycle. The ReAct pattern (Reasoning + Acting), where the agent alternates between reasoning in natural language and taking actions, is the most beginner-friendly and production-proven architecture to start with. Always include a step limit so the agent can’t loop forever.
Step 6 — Add guardrails. A production-grade orchestration layer with error handling, retry logic, input validation and monitoring is non-negotiable. Validate tool outputs before the agent acts on them to prevent hallucinated conclusions.
Step 7 — Test and evaluate. Use observability tools (LangSmith, Helicone, Langfuse) to trace every step, measure latency and track cost. Test against real tasks, not just happy-path demos.
Step 8 — Deploy. Wrap the agent in an API (FastAPI or Flask), containerize it (Docker), and deploy to a host like Google Cloud Run, AWS Lambda or Kubernetes. A simple single-tool agent with no memory can take only a few hours to build with basic Python skills.
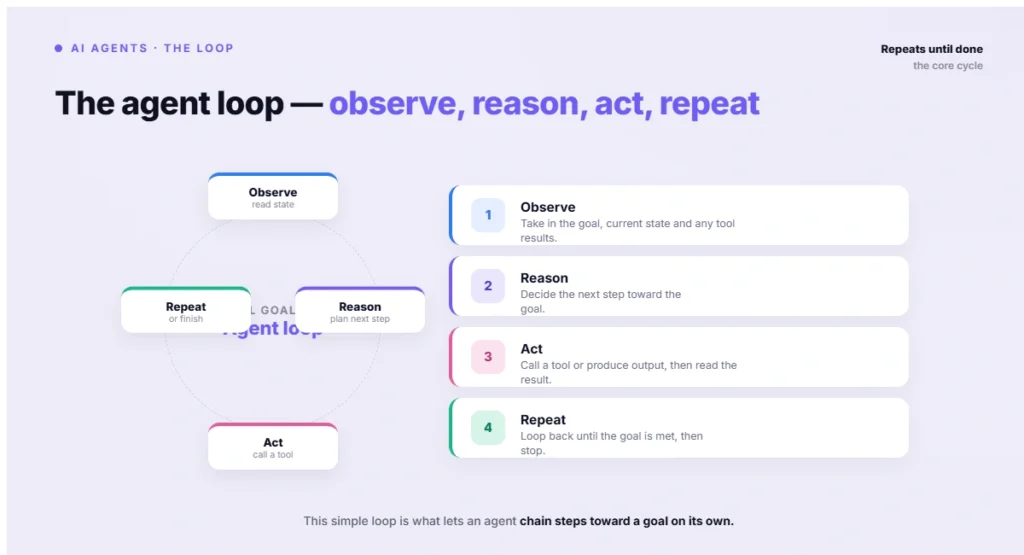
Figure 3: The agent loop — observe, reason, act, repeat
4. Frameworks vs Building From Scratch
You can hand-write the loop yourself or use a framework. Anthropic’s advice is to find the simplest solution and add complexity only when the task demands it — so many developers build their first agent from scratch to understand the loop, then adopt a framework once they’re writing the same plumbing repeatedly.
| Approach | Best for |
|---|---|
| From scratch (Python) | Learning the loop; minimal dependencies; specific performance needs |
| LangGraph | Fine-grained control, state management, compliance auditability |
| CrewAI | Role-based workflows, rapid prototyping, new to agents |
| AutoGen / AG2 | Iterative refinement, conversational multi-agent |
| LlamaIndex | Data-focused, advanced RAG, large knowledge bases |
| Vercel AI SDK | TypeScript tool-calling loops without the plumbing |
For a full breakdown of the options, see our guide to the best AI agent frameworks and the head-to-head on LangGraph vs CrewAI. If you’d rather not code at all, no-code platforms like n8n (n8n.io) let you drag and drop tools and link them to a model. The key principle holds regardless of approach: a framework should save you plumbing, not hide the loop you need to understand.
5. Common Pitfalls to Avoid
Four failure modes account for most broken agents, and all are preventable. Infinite loops happen when an agent keeps calling tools because it can’t confidently finish — always set a step limit and a clear stop condition. Wrong tool selection stems from poor tool descriptions; the model picks badly when it doesn’t understand what a tool does, so document tools thoroughly. Cost growth comes from multi-step reasoning and repeated tool calls becoming expensive at scale — route cheaper models where possible and cap steps.
Hallucination is the subtlest: agents generate plausible but incorrect conclusions if outputs aren’t validated against tool results, so always check what a tool actually returned before acting on it. These are the same reliability concerns that separate a demo from a production system, and they’re why Anthropic stresses transparency — explicitly showing the agent’s planning steps so you can see where it goes wrong. The broader pattern of grounding outputs in real data echoes our guide to fine-tuning vs RAG.
| 💡 Pro Tip Build the simplest version that could possibly work first. Start with one model, one or two well-documented tools, no memory, and a hard step limit — get that loop running end to end before adding anything. Most failed agent projects over-engineer early: they bolt on multi-agent orchestration and elaborate memory before the basic observe-reason-act cycle is solid. Anthropic’s guidance is explicit — find the simplest solution and add complexity only when the task genuinely demands it. |
6. Best Practices for Reliable Agents
Beyond avoiding pitfalls, a few practices from teams shipping real agents make the difference. Design the agent-computer interface (ACI) carefully — your tools and their documentation are how the LLM understands what it can do, so craft them as thoughtfully as you’d design a human-facing API. Treat context as a precious, finite resource: keep system prompts, tool definitions and message history informative yet tight, and decide deliberately what to keep, summarize or drop as history grows.
Prioritize transparency by surfacing the agent’s reasoning and planning steps, which makes failures debuggable and builds user trust. And follow Anthropic’s overarching principle from its widely cited engineering guide, Building effective agents: frameworks help you start quickly, but don’t hesitate to reduce abstraction and build with basic components as you move to production. You can also lean on the standardized tool ecosystem documented at modelcontextprotocol.io. Used together, these practices produce agents that are powerful, reliable and trusted — the qualities that matter once an agent leaves the demo stage, as we explore in best agentic AI tools.
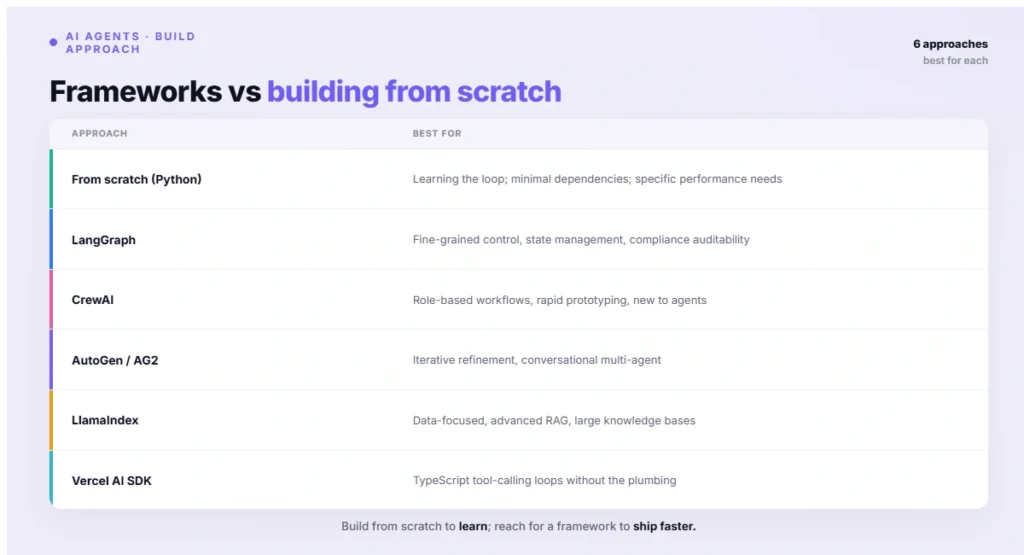
Figure 4: Frameworks vs building from scratch
| ⚠️ Important An AI agent takes real actions — calling APIs, running code, sending messages — so guardrails are mandatory, not optional. Always set a step limit to prevent infinite loops, validate tool outputs before the agent acts on them to catch hallucinations, document tools thoroughly so the model selects correctly, and monitor cost since repeated tool calls add up fast. Test against real tasks with full observability before deploying anything that touches production systems or sensitive data. |
7. Frequently Asked Questions
How do I build an AI agent?
Combine four components — an LLM (the reasoning brain), tools (APIs, search, databases for taking actions), memory (short-term context plus long-term storage), and an agent loop (observe, reason, act, repeat). Build in order: define the goal, choose a model, add tools, add memory, write the loop, add guardrails, test, then deploy. Start with the simplest version using the ReAct pattern and add complexity only when needed.
What’s the difference between an AI agent and a chatbot?
A chatbot answers a single prompt. An AI agent receives a goal and works through multiple steps to achieve it — searching the web, calling APIs, running code, querying databases and checking whether its result solved the task. The difference is the agent loop: the ability to reason, act, observe the result, and decide the next action autonomously until the goal is reached.
How long does it take to build an AI agent?
A simple single-tool agent with no memory can take only a few hours for someone with basic Python skills. Adding persistent memory, multiple tools, guardrails, evaluation and production deployment extends that to days or weeks depending on complexity. The practical advice is to ship the simplest working version first, then add capability incrementally rather than building everything upfront.
What language and tools do I need?
Python is the main choice for agent development. You’ll use an LLM API (OpenAI, Anthropic or Google), a memory store (FAISS, Pinecone or Weaviate for vectors), observability tools (LangSmith, Helicone or Langfuse) for tracing and cost, and a deployment stack (FastAPI or Flask, Docker, and a host like Cloud Run, AWS Lambda or Kubernetes). TypeScript developers can use the Vercel AI SDK.
What is the ReAct pattern?
ReAct (Reasoning + Acting) is the most beginner-friendly and production-proven agent architecture. The agent alternates between reasoning in natural language about what to do next and taking an action (calling a tool), then observes the result and reasons again. This explicit reason-then-act cycle makes the agent’s behavior more reliable and easier to debug, which is why it’s the recommended starting point in 2026.
Should I use a framework or build from scratch?
Build your first agent from scratch to understand the loop, then adopt a framework once you’re writing the same plumbing repeatedly. Use LangGraph for fine-grained control and compliance, CrewAI for role-based prototyping, LlamaIndex for RAG-heavy work, or the Vercel AI SDK for TypeScript. Anthropic’s guidance: a framework should save plumbing, but reduce abstraction and use basic components as you move to production.
How do I stop my agent from looping forever or hallucinating?
Set a hard step limit and a clear stop condition so the loop always terminates. To prevent hallucination, validate tool outputs against reality before the agent acts on them — don’t let it draw conclusions from unverified results. Document tools thoroughly so the model selects the right one, and use observability to trace each step. These guardrails are what separate a reliable agent from a fragile demo.
Can I build an AI agent without coding?
Yes. No-code platforms like n8n let you drag and drop tools and connect them to a model, building multi-step agentic workflows visually. These are excellent for business automation and prototyping. For more control, performance tuning or complex custom logic, a code-based approach with Python and a framework gives you flexibility that no-code platforms can’t fully match — many teams start no-code and graduate to code as needs grow.
8. Conclusion & Key Takeaways
Building an AI agent is less about the model and more about the loop and the engineering around it. Get the mental model right — an LLM autonomously using tools in a loop — assemble the four components (LLM, tools, memory, loop), and build in order: goal, model, tools, memory, loop, guardrails, test, deploy. Start with the simplest ReAct-based version, avoid the four classic pitfalls (infinite loops, wrong tool selection, cost growth, hallucination), and follow the best practices of clear tool design, tight context and transparency. Do that, and you’ll have an agent that’s reliable enough to trust in production. To go further, see our pillar on the best AI agent tools and the guide to the best AI agent frameworks.
- An agent is an LLM using tools in a loop — the loop, not the model, is the hard part.
- Four components: LLM (brain), tools (actions), memory (context), agent loop (engine).
- Build order: goal → model → tools → memory → loop → guardrails → test → deploy.
- Start simple with the ReAct pattern; add complexity only when the task demands it.
- Prevent infinite loops, bad tool selection, cost overruns and hallucination with guardrails.
Don’t start by choosing a framework — start by building the loop. Get an LLM reasoning, calling one tool, and checking the result, and you’ve built the heart of every agent. Everything else is just adding capability around that core.
